Want to facilitate great workshops and establish an even playing field? Then use an icebreaker to start off your session. Though icebreakers are often seen as a cheesy way to start of a meeting or a workshop they are a great tool in your arsenal. That is why they are the only exercise that is guaranteed to start every workshop that we facilitate.
What is an icebreaker?
An icebreaker is a short exercise that is used as an introduction between different people at the start of a meeting or a workshop. Often they are used when working with a new team or forming a new group of people together to ‘warm them up’ and create a path for teamwork and collaboration. Hence the term ‘icebreaker’ like the ships that literally break the ice up in the sea.
Whilst there are many different exercises that you can run as an icebreaker they generally take a similar format of getting a participant to share:
- Their name
- Their role
- Some information about themselves (either personal or work-related).
They often last no longer than 1-2 minutes per participant (and facilitator). This may seem like a long time, especially if it is a short workshop. But I guaratee, if done correctly, it is an excellent use of time which yields significant results.
Why should you use icebreakers?
When I first started my training as a facilitator I honestly could think of nothing worse than running an icebreaker. I soon learnt that they were hugely valuable for both the facilitator and the participants and could even be fun for everyone if done correctly.
There are many reasons why they are vital to a successful workshop, especially in collaborative design:
1. Icebreakers allow everyone in the room to know who each other is and what they do
This is vital for a succesful meeting or workshop. As nothing causes friction in a group session like participants who don’t know who each other. Often within a group people may know some of the participants better than others, if at all. In order to avoid the normal groups forming and creating a new team – it is imperative for everyone to understand who is part of that team and why they are party of that team.
Additionally, as a facilitator it is a great way to get a high-level overview of each participant and create a map to refer to (so you never forget a participants name!).
2. Icebreakers give participants an opportunity to learn something new (and human) about each other
Even if the participants do know each other, this gives them an opportunity to learn more about everyone. Depending on the question asked, there is an opportunity for colleagues to move away from the day-to-day of what they do and find out something interesting and help show that they are all humans and not just their job. This way you can quickly build some rapport between the participants and yourself beyond your day-to-day work interactions.
3. Icebreakers increase participation throughout the session
This is because everyone in the room will be able to instantly answer a question and contribute, equally. When conducting any research or asking for any sort of collaborative participation: if the participant can easily answer the first question asked, they are more likely to provide better responses and participate during the rest of the process. And there is nothing easier for even a nervous participant to answer than their name! By showing interest and validation for their response as a facilitator you can quickly put your participants at ease and set the tone for an open, collaborative session.
Additionally, by asking all participants to answer the same set of questions in turn you are setting up a level-playing field. This creates a sense of equality for the participants that each person matters equally and will be given the opportunity to contribute.
Our favourite icebreakers
We use icebreakers in every workshop we do and there are a variety that we use time and time again. I would highly recommend that you tailor your icebreaker to the participants and what you are looking to achieve in a session. But saying that, here are several go-to-icebreakers that we use:
Superhero icebreaker
When to use: For groups who may not know each other and when you wish to start a workshop with a positive ‘hero’ mindset.
Instructions: Ask each participant to go round the room and tell us:
- Their name
- What their job or role is
- If they could have any super power at all, what would it be and why?
The facilitator should start the exercise off to give an example of how it works and also enough time for the first participant to think of their answers. As the participants answer in turn, jot down the name, role and superpower of each person as a map of participants that you can refer to throughout the rest of the session.
2 jobs and a lie
When to use: For groups who may not know each other well and need to build a deeper rapport with each other.
Instructions: Based on the classic kids game ‘2 truths and a lie’ this is a more sanitised version suitable for the workplace. Ask each particpant to go round the table and tells us:
- Their name
- What their current job or role is
- 3 jobs that they have had previously (where 2 are real but one is a lie).
Then ask the rest of the group which job they think is a lie. As the participants answer in turn, jot down the name and role each person as a map of participants that you can refer to throughout the rest of the session.
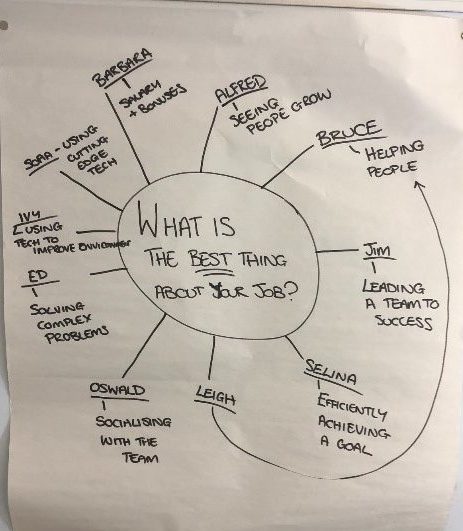
What is the best thing about your job?
When to use: For groups who may be sceptical about the approach or disenfranchised with each other / their organisation that you wish to put into a positive mindset.
Instructions: Ask each particpant to go round the table and tells us:
- Their name
- What their current job or role is
- What is the best thing about their job?
As the participants answer in turn, jot down the name, role and what is the best thing about their job. Only accept positive answers and if the response is ‘nothing’ maybe such some such as ‘it allows me to help people achieve’ or even ‘going home time’ / ‘lunch time’. The prompt will often make them think of something, no matter how small.
What do you want to achieve today?
When to use: For groups who may be sceptical about the approach or who have limited time and different objectives.
Instructions: Ask each particpant to go round the table and tells us:
- Their name
- What their current job or role is
- What they want to achieve from today’s session?
As the participants answer in turn, jot down the name, role and what each person wishes to achieve as a map of participants that you can refer to throughout the rest of the session. At the end of the session you can revisit this map and ask if people manged to achieve their objective for today, and if not how they will be to do take it forwards after the session (and if they need to).
The most important thing
When to use: For groups who are tackling a complex design challenge, where there are competiting priorities and opinions, but a clear outcome to achieve (e.g. How might we reduce company carbon emissions?).
Instructions: Ask each particpant to go round the table and tells us:
- Their name
- What their current job or role is
- What do they think is the most important thing they/their organisation could do to achieve their desired outcome? e.g. What do you think is the most important thing that you can do to reduce carbon emissions?
As the participants answer in turn, jot down the name, role and what each person things is the most important thing. At the end of the session you can revisit this map and ask if people they still think that is the most important thing.
The biggest challenge
When to use: For groups who are tackling a complex design challenge, where there are a variety of challenges to overcome, but a clear outcome to achieve (e.g. How might we improve the health and wellbeing of citizens?).
Instructions: Ask each particpant to go round the table and tells us:
- Their name
- What their current job or role is
- What do they think is the biggest challenge to overcome? e.g. What do you think is the most important thing that you can do to reduce carbon emissions?
As the participants answer in turn, jot down the name, role and what each person things is the most important thing. At the end of the session you can revisit this map and ask if people they still think that is the most important thing.
Our icebreaker facilitation top tips
- The facilitator should always go first and confidently answer all three of the questions. Even if you have just introduced yourself as a facilitator it is key to answer all three questions so you can give a slick (and if appropriate fun) example of how the exercise works. Additionally, it allows participants to have sometime to start thinking about their own answers to question 3.
- The facilitator should write the answers to at least the first two questions on a map, preferably that the whole group can see throughout the session. I recommend writing them as a spider chart as this is the easiest way to see the names of your participants in the order they are sitting. Use your own name as an anchor so you know where the map starts and stops. In addition to giving the group a map of where everyone is sitting, it also showcases that you are paying attention to every response given and that each participant is equally important.
- Ensure you write in big CAPITALS so people can read it from a distance and a glance.
- If you are not sure how to spell a name, just ask.
- Try to get unique answers. E.g. ‘Ok so what is the second most important do you think?’. If people are insistent that they want the same answer as someone else write their name next to that answer.
- If you don’t hear someone or understand don’t be afraid to ask again (‘I’m sorry, I didn’t catch that’). Or ask them to expand (‘So what do you mean by that exactly?’).
- When paraphrasing or shortening an answer you capture don’t forget to ask permission and check that you captured the essence. E.g. ‘So, would it be fair to say that….’ / ‘can I write that as….’ / ‘How would you shorten that?’.
- Try to keep it fun, light and fast. That way it will set the tone for the session and allow people to relax and be themselves.
- If you need to do some sketching during the workshop think about asking participants to sketch something as an icebreaker. Some examples we have used are their business card, their breakfast, their spirit animal etc. This might be daunting for participants but it will help them get over the nerves of drawing early in the session.
- Do not shortcut it! If time is constrained, think of a exercise or question from your workshop you can turn into an icebreaker. That way, you can achieve the icebreaker’s intended purpose whilst also getting an answer to one of your core questions.
Want to know more about icebreakers and collaborative design?
If you’d like learn more about how to solve complex challenges with our collaborative design workshops then call Esther on 0131 467 9227 to discuss how we can help.